Display resolution and scene files
The designer needs to know the dimensions of the screen. At the same time, the program needs a place to load the image data from. This page explains display customization and the store scene data in file option, which can save RAM especially with multiple static screens.
Resolution according to initialized display
The designer follows the initialization block inserted in the project, not just the selected processor or the blocks available in the menu. The display in this case does not need to be physically connected: its profile is obtained by the IDE from the block and add-on in the browser.
- Built-in OLED initialization provides a 128 x 64 profile.
- The registered add-on may provide a different resolution depending on the selected panel.
- With no initialization block recognized, default 128 × 64 will be used.
- If there are several registered initializations in the project, the last valid initialization created or changed is active. Removing the active initialization returns the selection to the previous one.
Simply installing an add-on or unpacking its category will not change the resolution. Insert its initialization block into the program and choose the correct display type.
Editor resolution is not device initialization
The designer prepares the correct dimensions of the design according to the profile. However, the actual display only initializes the program on the board. Both data must agree; by manually changing the resolution in the designer, you will not change the physical dimensions of the display or its controller.
WeAct e-paper as an example add-on
The WeAct e-paper / e-ink plugin uses its own initialization block. The selected panel will pass the resolution to the designer:
| Panel selection in add-on | Design Resolution |
|---|---|
| WeAct 1.54″ black and white | 200×200 |
| WeAct 2.13″ black and white | 122×250 |
| WeAct 2.9″ black and white | 128×296 |
| WeAct 4.2″ black and white | 400×300 |
| WeAct 4.2″ black/white/red | 400×300 |
After selecting, for example, WeAct 4.2″ black and white, open the so far empty scene. The designer switches to 400×300, instead of the original 128×64 OLED area.
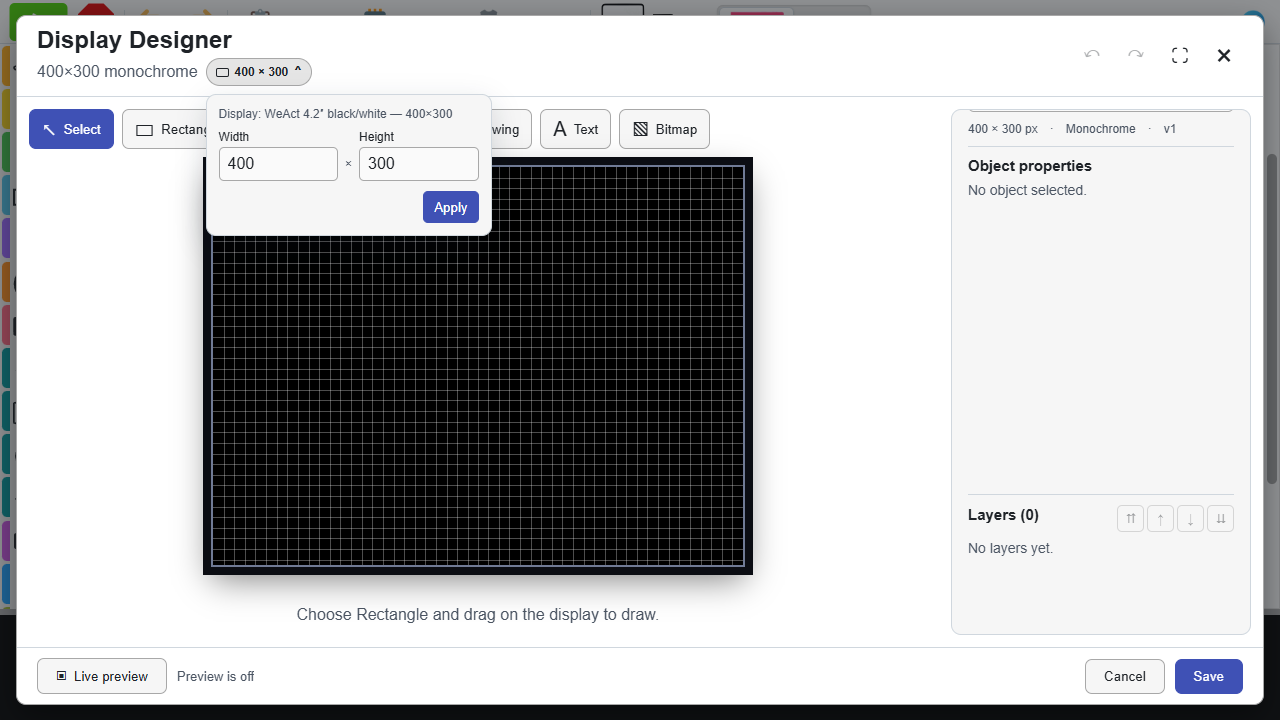
Resolution and color options are not the same. This part of the designer creates a monochromatic scene; also the mentioned three-color WeAct profile registers it as monochrome. The selection of a black-white-red panel alone will not add a third drawing color in the designer.
The simulator has its own virtual OLED 128 × 64. Selecting WeAct or changing the scene resolution will not automatically turn it into a virtual e-paper. Verify the actual rendering on WeAct on the respective device. The plugin uses full redraw; don't design the refresh rate based on the behavior of the small OLED in the simulator.
What happens to an already drawn scene
An empty, not-yet-edited default scene takes over the resolution of the active display automatically. An existing drawing or a manually entered resolution will not automatically reset when the initialization is changed later.
This protects the finished design from unexpected clipping. You confirm the change yourself:
- In the header, open the button Resolution, which shows the current width and height.
- Check the line Display with the active profile.
- If the dimensions are different, use the offered option to adopt the display resolution, or enter your own Width and Height and confirm Apply.
- Go through the objects, check their position and save the design.
Changing the resolution does not mean a proportional enlargement of the entire drawing. Coordinates and drawing continue to work in pixels, so a smaller area can crop some objects. For bitmaps, adjust the dimensions separately.
Each dimension can be 1 to 1024 pixels and the monochrome framebuffer must also meet the 65535 bytes limit. This editor limit is not a guarantee that a specific board will have enough free RAM for the entire program.
A separate technical description [display registration in the designer] (../Doplnky/displeje-a-designer.md) is intended for add-on authors. A normal user of the add-on does not write this registration.
Save data to file
The store scene data in file option is on the Blockly block of the scene, not in the drawing object's properties menu. It is disabled by default.
When the IDE is turned on, it prepares static images of the scenes in a common file /gfx/scene.dat. The generated Python then contains the loading of the correct image from the file instead of embedded image constants.
How to use it
- Prepare the scenes and save them from the designer in their blocks.
- On any scene block, turn on store scene data in file. The same option is set on the other scene blocks of the project; new blocks will take over.
- Load the block program with the usual button Run code.
- The IDE also uploads the necessary image data and fonts to
/gfxbefore the program.
Activation applies to the entire project. It is not about choosing your own file name for each block or about writing measured values to a file.
What happens when rendering
- The program opens
scene.datand checks its header against the generated program. - Goes to the corresponding location in the file for the desired scene.
- Reads the image directly into the existing display buffer. It doesn't create a second whole framebuffer for that.
- Renders dynamic objects above the static background according to the attached values.
- Possible sending to the display is further controlled by the Refresh display option.
The file does not contain text JSON of the design. Monochrome images are prepared in it; the program does not reinterpret the entire editable design or decompress the compressed image each time it is rendered.
Where RAM is saved
Without file mode, for each precomputed background, its entire image can be stored as a data constant in the generated Python. With more scenes or a larger display, this makes up a significant part of the program and its memory requirements.
In file mode, these images remain in the file system and only the necessary scene is read into the buffer. The working framebuffer of the display, however, remains in RAM, as well as variables, dynamic objects and any necessary font data. So it is not about removing all memory requirements of graphics.
For this monochrome format, the image size is calculated as width x height rounded up to eight pixel pages:
| Resolution | Image of one scene | File for one saved image |
|---|---|---|
| 128×64 | 1,024 B | 1,040B |
| 200×200 | 5000B | 5,016 B |
| 400×300 | 15,200 B | 15,216 B |
The file has one common header 16 B. Ten saved 128 x 64 still images will thus occupy 10,256 B in the file. The data describes the image data, not the measured total RAM consumption of the program or all the buffers of a specific driver.
For a smaller amount of inserted constants, the reading of the file will increase when changing the scene. Profitability therefore depends on the number and size of scenes and how often you render them.
Relation to other options
| Choice or situation | Behavior |
|---|---|
| precompute static layers no file mode | On prepares the background as an image constant; off generates drawing using commands and possible partial bitmaps. |
| store scene data in file on | File mode takes precedence for static backgrounds. Data is prepared to scene.dat even when precomputation on an individual block is turned off. |
| Refresh display off | The scene fills the buffer, but you only send it with a separate command. Loading the file does not turn it on by itself. |
| Scene with no static pixels visible | It will not add a blank image to the file. It will use buffer clearing and any dynamic layer. |
| Only empty or dynamic scenes in the project | The new scene.dat does not load because there is no still image for it. |
Use the same resolution for all scenes in file mode. Do not combine, for example, an OLED screen and a large e-paper with a different framebuffer size in one package.
What to store and transfer together
| Data | What is |
|---|---|
| Block Project | Editable scene, its layers, used fonts and block connections. You return here when editing. |
| Generated Python | An executable program that draws or loads images. It is not a substitute for an editable scene. |
/gfx/scene.dat |
Static backgrounds required for file mode enabled. |
/gfx/*.mfnt |
Fonts needed for dynamically changing text. |
Running the block program normally from the IDE will take care of the data files. If you copy Python manually or run your own text file, transfer the corresponding data as well. Automatic compilation and uploading of documents is linked to the block project.
After changing the scene, upload the program again from the current project. The new Python and the old scene.dat may not belong together; the program checks their compliance. Also, the file on the device is not a resource for reopening a fully editable design in the designer.
Tips and pitfalls
| The problem | What to check |
|---|---|
| Designer still shows 128×64 | Insert the correct initialization of the display. For an already edited scene, take over the dimensions explicitly in the Resolution menu. |
| After changing the resolution, something does not fit | Check coordinates, dimensions of objects and length of texts; the drawing is not recalculated as a photo stretched to a new window. |
| After turning on the file, the RAM is still occupied | The display buffer, program and dynamic graphics remain in memory. The option mainly moves static backgrounds. |
File missing or mismatch reported scene.dat |
Reload the corresponding block project including the data; do not use a file from another version of the design. |
| The scene fills the buffer, but nothing changes on the display | Verify Refresh display or subsequent separate command to send the image. |