Simulator - the first program without a board
The simulator allows you to run the program directly in the ESP IDE and monitor its result on virtual components. You don't need a connected board, USB cable or firmware installation. The program is executed in MicroPython in the browser.
Start with the first program: you will write a message, flash an LED, and then control it with a button. You can also open finished block projects directly in ESP IDE via shared links.
Pins and use of other elements can be found in the Virtual simulator components chapter.
You can also use dashboard to monitor values and control variables, which also works with the program in the simulator.
How to open the simulator
- In the top menu, open Device → Processor.
- Select Simulator. This is how the item is also named in the Czech environment.
- Wait until you see the status Ready at the panel title. It shows Starting… when loading.
- Assemble the program in blocks and click the green button Run code.
print() command output and program errors are displayed in a normal terminal under the editor. The simulator panel is used to control virtual inputs and display outputs.
You don't have to connect the device
After selecting the Simulator target, the IDE will connect to the simulator itself. Do not select USB port or Bluetooth device. If you want to work with a real board, change the processor back to its type and connect it in the usual way.
What's in the panel
Components have pin numbers with them. You enter these numbers into the blocks. For example, you control the LED marked GPIO 1 with the digital output on pin 1; you read the GPIO 17 button as a digital input on pin 17. You don't have to draw wires between them.
In the panel you will find LEDs, buttons, analog sliders, OLED display, joystick, encoder, servos, motors, NeoPixel and DHT22 sensor. For the first attempts, one LED and one button are enough. Select the blocks from the categories on the left in the same way as when programming the board.
What does the simulator panel look like
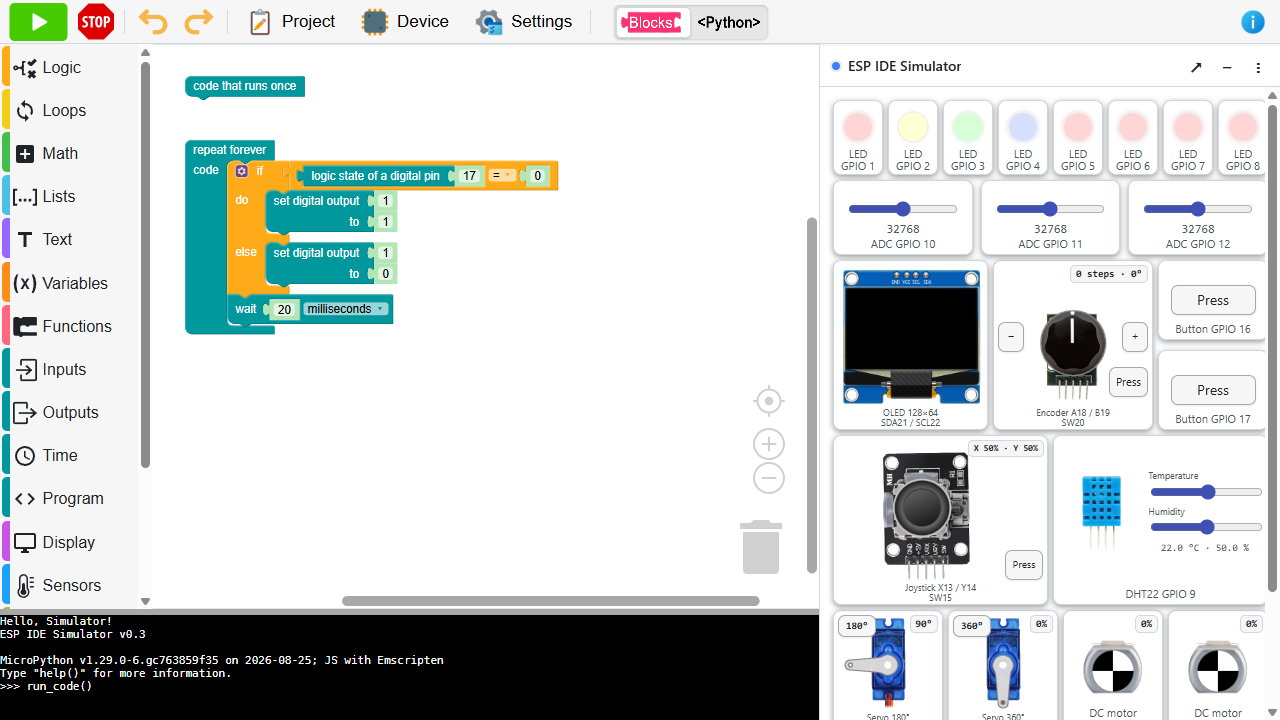
Window control
| Control | What will |
|---|---|
| ↗ Disconnect simulator | Changes the docked panel on the right to a floating window. It is about changing the location of the panel; the program continues. |
| Dock simulator on the right | Returns the floating window to the right edge of the editor. This option appears instead of disconnecting the panel. |
| − Hide simulator | Hides the panel. You won't stop the program with that. You can open it again with the side button ▣ Simulator. |
| ⋮ Simulator Options | Opens a menu with the item Factory reset FS. This restores the simulator files to their original state. |
On a wider screen, you can move the floating window behind the header outside the buttons and change its size. You can adjust the width of the docked panel by dragging its left edge. On a narrow screen, layout is limited by available space.
Factory reset FS will delete file changes
FS means file system. After confirmation, the reset deletes custom files and file modifications inside the simulator and restores the supplied libraries. Use it only when you want to start with the original content. The red Stop program button is enough to normally stop the program.
Start, stop and return to work
| Action | What happens to the program and data |
|---|---|
| Run code | The IDE prepares a new runtime environment, loads the current program, and runs it from the beginning. Variable values from the previous run are not carried over. |
| Stop program | Restarts the simulator runtime. The running program ends and its variables are lost. Blocks will remain in the editor. |
| Hide panel | It only changes the display of the panel; the running program continues. |
| Choose another processor | Deactivates the simulator. Upon returning to the Simulator, its environment will restart. Start the program again with the green button. |
| Factory reset FS | Restores the original files and restarts the environment. Custom files and their modifications are deleted. |
Where files are stored
Via Device → File Manager you can view the simulator files just like board files. The manager stops the running program when opened.
Custom files and simulator file changes are saved to the browser's local storage. They persist during normal next start, program stop, page refresh or processor switch. This is different from running program variables that don't survive a reboot.
Local storage does not replace backup
The data belongs to a specific browser and website address. You may lose your site data after clearing it or ending private browsing. Download the important files to your computer and save the block project via Project → Save to PC. If your browser blocks local storage, don't rely on file retention.
What to expect versus the actual board
- The connection is given by the panel. To control the component, use the pin from its label. Changing the number in the program will not move the virtual component to another pin.
- Support has its limits. The simulator includes adapters for selected components and modules. A program for a different sensor or library may end up with an error even if it works on the board.
- You are mainly verifying the behavior of the program. Verify the response and load of the real board, electrical connection or power supply on a real device. The simulator does not model all the characteristics of the processor and components.
- Blocks and Python use the same simulator. In text mode, the active tab is launched. Returning to blocks will not convert the Python native to blocks; details are in editor orientation.
Tips and pitfalls
In the simulator you can also highlight blocks, step on breakpoints and monitor variables without stopping. Conditions for stopping and resolving shared memory reports are summarized by debugger attachment.
| What do you observe | What to check |
|---|---|
| The panel is not visible | Check the Simulator processor selection. If it's just hidden, open it with the ▣ Simulator button on the right edge. |
| LED does not respond | Compare the pin number in the block with the LED label. Verify that you clicked on Run code again after editing and that you don't have another Python tab active. |
| The button does the opposite | The GPIO 17 button returns 0 when pressed, 1 when released. Use the condition from button example. |
| The program ended with an error | Read the message in the terminal. Pin number, missing module and program error require various fixes; resetting the files alone may not resolve them. |
| The program does not respond to inputs | Stop him and check the loops. Add a short wait to your own infinite loop. A loop that just counts without a break can prevent input handling. |
| A message will appear about shared memory or incompatible versions | Save the project and refresh the ESP IDE to load the current files. If the problem persists, send an exact report and page address to the administrator. Debugging and live inputs also require proper server settings and browser support. FS factory reset will not fix this setting. |