Menu Project
In the Project menu you work with the program and its form in the editor. When working with blocks, you save the entire block project. In text mode, file actions apply to the active tab.
Show Project menu
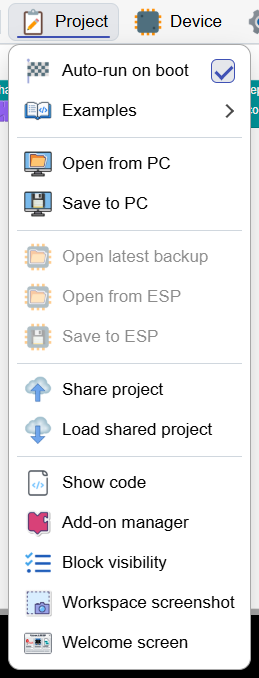
First save the project
| Item | What will |
|---|---|
 Open from PC |
In block mode, you select the file .blk or .xml and load the project onto the workspace. In text mode, the item is named Open file from PC; file .py or .txt will be loaded into the active tab and modify its name. |
 Save to PC |
Downloads the block project to the computer. You enter a name; without the suffix, .blk is used. In text mode, Save file to PC will download the contents of the active tab under its name. |
 Open latest backup |
Loads the last automatic backup of the block project backup.blk.gz from the connected device. Stops the program before loading. |
| Open from ESP |
Opens the file manager of the connected device. In it you select a file to open; it is not an automatic recovery of blocks from the currently running Python. |
 Save to ESP |
Saves the block project under the specified name as a compressed file .blk.gz in the /BLK folder on the device. In text mode, it saves the active file to the device by its name or memorized path. |
Opening another project may change your workspace
Before loading a file, example, shared project or backup, save the project in progress via Save to PC.
What is the difference between the files?
| File | What is |
|---|---|
.blk, or .xml |
Project with blocks for further opening and editing in ESP IDE. |
.blk.gz |
A compressed block project that the IDE uses when saving to the device and for automatic backup. |
.py |
Python program text. It is not a block project. |
idecode |
The file to which the Run Code action uploads the executed program. Use a saved project or a backup to restore the block layout. |
Automatic backup save options are in Settings → Save Backup. Their meaning is described in Settings menu.
You can find an overview of graphics and dashboard files as well as the transfer procedure to another board in the section [Project files and backup] (soubory-a-zalohy.md).
Run automatically after startup
 Auto-run on boot is the checkmark for the program you will record.
| Status | What does |
|---|---|
| Checked | When uploading via Run code, an auto-start tag is added to the program. According to her, the corresponding ESP IDE firmware will run the stored program after the device starts. |
| Unchecked | The program will run normally when you run the code, but the autostart tag will not be added to the newly uploaded program. |
Changing the checkmark itself will not overwrite a program that is already on the device. It will take effect the next time you upload via Run code. Also, Save to ESP itself is not the same as uploading an executable to idecode.
Current option and default settings
Here you change the current check mark. The Settings → Always run code on startup option determines how the checkbox should be set the next time the IDE is loaded. Both options are explained in settings overview.
The simulator does not call automatic start from main.py during its initialization. In it, start the program with the button Run code.
Examples and sharing
| Item | What will |
|---|---|
 Examples |
Expands a catalog of sample projects divided into categories. Clicking on an example loads its blocks into the editor; you don't start the program yet. For the Czech environment, we are looking for a Czech or English example. Other languages use English projects. |
 Share project |
Sends the block project to the share server. In text mode, the item is named Share file and sends the active text file. The result is a code and a link that you can pass on to another user. |
 Load shared project |
Opens a dialog for entering a six-character share code. Depending on the shared content, blocks or a text file will be loaded. If you have the entire shared link, open it directly in the browser. |
Sharing needs a server connection. It is not about communication via USB or Bluetooth with the board and does not replace your own saved copy of the project.
Display code and block menu
| Item | What will |
|---|---|
 Show code |
Creates or updates blockly.py from the blocks and opens it in a text editor. In text mode, the same action returns the blocks view. Text edits are not carried back to blocks. |
 Add-on manager |
Opens .newblk add-ons management that add new blocks and related features. You can find the procedure in the Adding add-on section. |
 Block visibility |
You select the categories or groups of blocks that you want to offer in the toolbox. It allows to simplify the left menu for beginners for example. |
Checkmarks in the Display Blocks dialog
- Checked category or group: its blocks will be available in the menu.
- Unchecked category or group: will be hidden from the menu.
- For categories with multiple groups, you can only select some parts.
- Confirming the dialog will save the filter and rebuild the block menu.
The filter modifies the toolbox, not the blocks you already have on the workspace. When you hide a category, you don't delete the existing program. If the block is still missing, also verify the selected processor and enabled add-ons.
More items
| Item | What will |
|---|---|
 Workspace screenshot |
Downloads a PNG image of the entire block workspace, including blocks outside the currently visible viewport. It is suitable for a tutorial or for showing a program; the image does not replace the saved project. |
 Welcome screen |
It will reopen the introductory menu with demos and links. You can return to it even after starting the IDE for the first time. |
You can also call up the snapshot of the block surface with the keys Ctrl+Shift+S, if you are not currently writing in the input field or the text editor. The shortcut takes an image, does not save the project file.
Tips and pitfalls
- Download the project to your PC before major editing or loading the example.
- Saving to and opening files on the device requires a connection; working with PC files does not need it.
- Automatic backup keeps the last uploaded block project, not the history of all its versions.
- File manager and opening the last backup stop the running program.